Video editing techniques are really important for making videos look better. One helpful technique is called keyframing, which can make your videos more interesting and fun to watch. By using keyframes, you can add smooth animations that grab people’s attention. They also help highlight the most important parts of your video.
This guide will teach you about keyframe animation, its types, and how to use them in your videos. By the end, you’ll know how to add keyframes to make your videos more exciting using a tool called Wondershare Filmora.
Post Contents
Part 1: What are The Types of KeyFrame?
When you want to change how something moves in a video, you can use different types of keyframes. Here are the main ones you need to know about:
- Linear Keyframe: A linear keyframe makes things move in a straight line at the same speed. It’s like moving a toy car from one side of the table to the other without changing how fast it goes. This kind of movement is simple but can feel a bit stiff or robotic, so people don’t use it as much.
- Bezier Keyframe: A Bezier keyframe makes the movement smoother and more natural, like how a ball might roll faster down a hill and then slow down as it reaches the bottom. You can change how fast it moves at different points, which helps make the animation look better.
- Auto-Bezier Keyframe: The Auto-Bezier keyframe smoothens things for you. It automatically makes the movement smooth without you having to adjust it yourself, which saves a lot of time.
- Continuous Bezier Keyframe: This is similar to the Bezier keyframe but allows you to change the movement on just one side of the keyframe. It’s helpful when you need more control over how something moves.
- Hold Keyframe: A hold keyframe freezes the video like a still picture, making the action stop for a moment before it continues. It’s useful when you want to pause the movement for a bit.
- S-Curve Keyframe: An S-curve keyframe starts slow, speeds up in the middle, and then slows down again at the end. It creates a gentle, wave-like motion.
- Ease-In and Ease-Out Keyframes: These keyframes start an animation slowly, then make it faster, and finally slow it down again before stopping. This makes the movement feel more natural, like how a car gradually starts moving and then slows down when it stops.
These keyframes help you control how things move in your videos, making them look more interesting and smooth.
Part 2: What is the Purpose of Keyframes in Video Editing?
You’re probably curious about why keyframes are so important in video editing. If you’re new to video editing, you might be wondering whether you should learn how to use keyframes. Don’t worry! This section will explain what keyframes can do and why they’re so helpful in making your videos awesome.
- Animation and Transformation: Keyframes let you add cool animated objects or effects to your videos. You can make things move, change size, or spin around. You can even make objects break apart or add motion graphics, which are like special effects that make your video more exciting.
- Visual Quality: Keyframe animation can help make your video look better by letting you adjust colors and effects. You can change the brightness, color, and transparency of parts of your video to make it look more professional and eye-catching. Keyframes can also add dramatic effects that make your video look like it was made in a studio.
- Smooth Transitions: If you want your video to move smoothly from one scene to another, keyframes are the way to go. You can use them to create smooth transitions, like fading from one scene to the next or adding a dramatic effect between scenes. This makes your video feel more connected and professional.
- Remapping and Synchronization: Keyframes also let you change the speed of your video and make sure everything is timed perfectly. You can speed up or slow down parts of your video and even sync the audio with the video so that it matches perfectly. This helps you create videos that look and sound great, making them stand out.
So, keyframes are like magic tools in video editing that help you make your videos look amazing and professional.
Part 3: How To Add Key Frame Animation Using Filmora
This guide will show you how to add a keyframe to your video to make it more interesting. Wondershare Filmora Keyframes are used for many things, like splitting screens, changing colors, editing text, and adding special effects. You can also save keyframes as a custom preset to use them easily on other parts of your video.
When it comes to animations, keyframes let you create your own. They allow you to set different points in your video and smoothly animate them over time.
Step 1: Import Your Video
First, open the video editing app and import your video. You can either follow the prompts or drag the video from your files directly to the timeline at the bottom.
Step 2: Open the Keyframe Feature
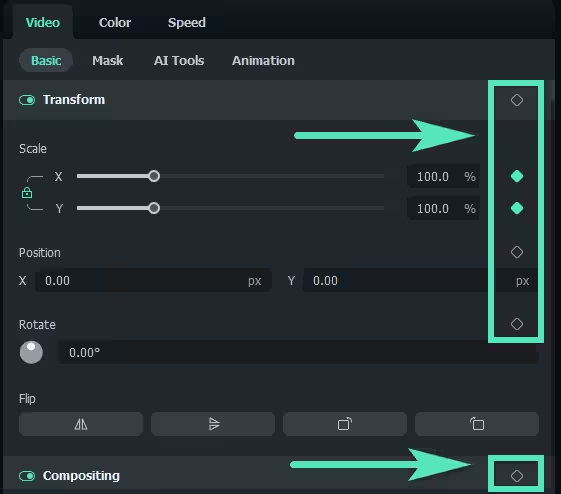
Click on your video clip in the timeline. On the right side, a property panel will appear. Go to video> Basic, then click on the diamond icon to add a keyframe. Any feature with a diamond icon can be turned into a keyframe.
Step 3: Add Keyframes
Move the progress bar to the spot where you want to add your first keyframe. Click the diamond icon in the property panel to set the keyframe.

Note: There’s also a special keyframe icon in the timeline toolbar. Just place the playhead (the line that shows where you are in the video) where you want to add a keyframe and click the icon. All keyframe values will be selected automatically.
How to Edit Keyframes?
Step 1: Adjust the Settings
You can change the settings (like size, position, or color) for your keyframe in the property panel. Move the sliders, change the numbers, or add effects until it looks how you want. Here are some settings you can change with keyframes:
- Video: Adjust things like position, size, shadow, or special effects.
- Audio: Change the volume, balance, fade in or out, pitch, and equalizer.
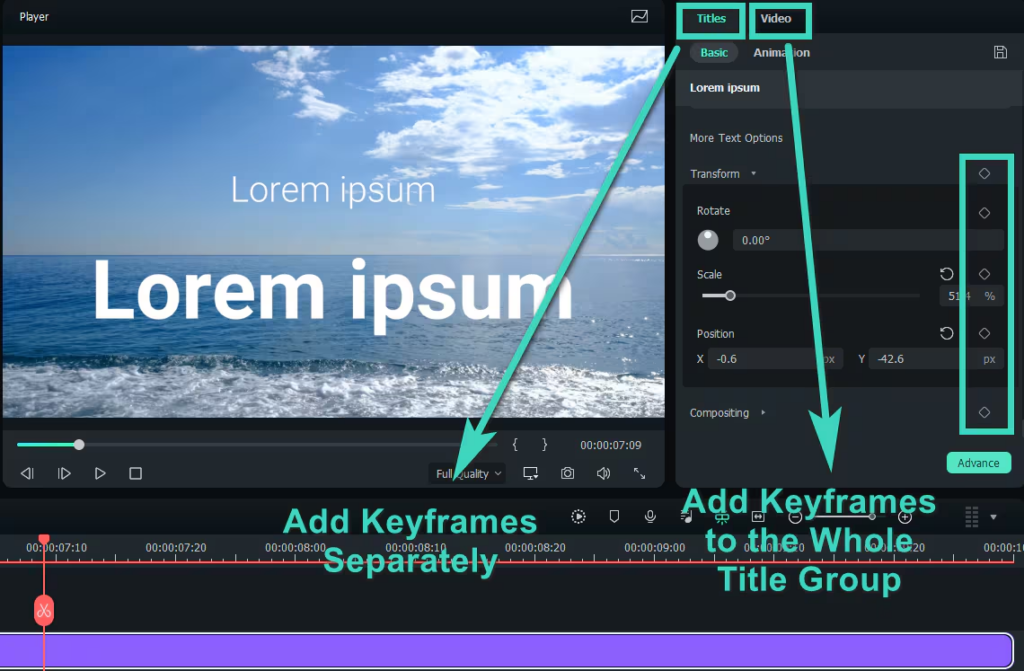
- Titles: Animate the titles (text) in your video, either as a group or individually.
- Effects: Apply different effects from the Filmora library.
- Stickers and Split Screen: Animate stickers or split screens using keyframes.

Step 2: Add More Keyframes
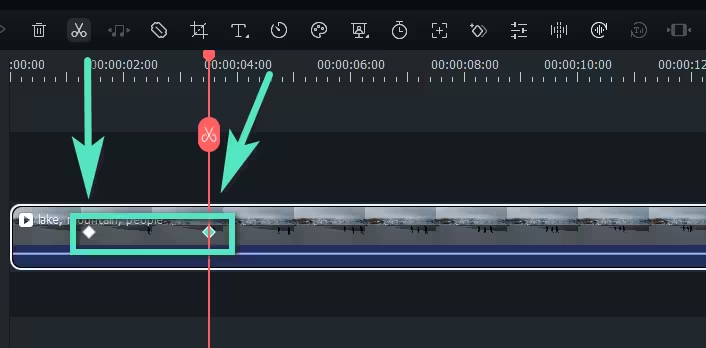
After setting one keyframe, a diamond icon will appear on the timeline. Move the progress bar to another spot in the video where you want to add a new keyframing in filmora. This can be the end of the animation or another effect. Adjust the settings for this keyframe as needed.

Note: You need to add at least two keyframes with different settings to create an animation. Otherwise, the effect will stay the same throughout the whole video.
Step 3: Save Your Changes
When you’re done adding and editing keyframes, click “Ok” to save your work. The app will automatically apply the changes between the keyframes and export the video with smooth transitions.
And that’s how you can use keyframes to make your videos more dynamic and exciting!
Conclusion
Keyframes are powerful tools in video editing that help you create smooth animations, enhance visual quality, and add special effects. By learning how to use keyframing in Filmora, you can transform your videos into professional-looking projects.
Whether you’re adjusting color, adding transitions, or animating text, keyframes give you the control to make your videos stand out. Practice using keyframes, and soon, you’ll be able to create dynamic, engaging content that captures your audience’s attention.